For many of us in the sport of weightlifting, the jerk is like death and taxes: necessary, unavoidable, and best put off for as long as possible. But it doesn’t have to be this way! Avoiding properly training the jerk is like showing up to a competition with an automatic red light before you even step onto the platform: you’re just putting yourself at a disadvantage.
Given the pandemic, odds are you’re quarantining at home or protesting the quarantine by standing outside government buildings carrying an assault rifle. Either way, you’re probably not training, or at least not training as much as you’d like.
In short, it’s the perfect time to step back, put down your comical misinterpretation of the Second Amendment, and consider some essential basics for performing a successful jerk.
First, make sure you do a good clean.
Yes, there are some lifters out there—most notably from the DPRK—who can grind out a clean that blasphemes the very sport itself before executing a near flawless jerk. If you’re reading this right now that means you are currently on the internet and thus, ipso facto, not in the DPRK.
So, step one, do a good clean.

Second, the setup:
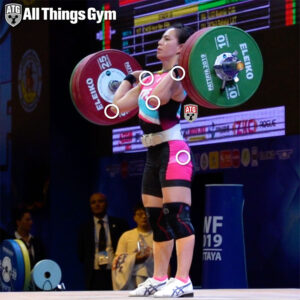
take just a second to consider your positioning and relationship to the barbell. The chest and shoulders should be up—i.e., actively (but not necessarily exaggeratedly) “turned on” and helping support the weight. The elbows should be angled slightly down and out
(NB: I’m not going to wade into the elbows up/elbows down debate here, mostly because I don’t feel like drowning in it; I will touch on it again in the next step).
The hips should be roughly in line with the shoulders—imagine an invisible line linking the shoulders to the hips and continuing down through the midline of the feet. This is the line through which you’ll be developing and delivering power.
Next comes the dip:
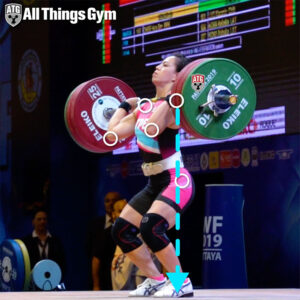
 The dip should be straight down, without excessive horizontal movement of the hips, bar, or shoulders. What this means is keeping the torso rigid, and resisting the pull of the weight forward.
During the dip it’s best to keep the arms motionless—whether you’re an elbows up or down person is less important than keeping them still during the dip.
A common error is allowing the elbows to slide down during the dip, either due to torso weakness or in anticipation of the eventual drive up. Don’t do this! Lifting the elbows during the dip is sometimes used successfully—Rebeka Koha does this with great results, as it appears to help her keep the torso rigid. That said, are you a two-time Junior World Champion from Latvia? No? Well then…
The DRIVE:
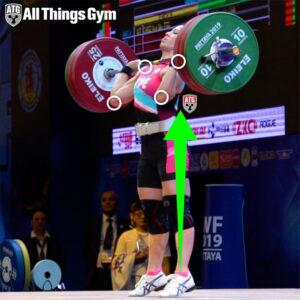
 When the dip is complete—and this is important whether the dip is short or long—you want a quick change in direction for the drive. The drive should be an explosive extension through the balls of the feet and up through the chest and shoulders.
The rigidity of the torso and the linkage between the hips and shoulders is so important here: without rigidity all your leg drive will dissipate through your mashed-potato core.
While the legs are the primary driver here, the actual power is being delivered through the shoulders and the hands; for this reason the torso must be rigid and the arms must wait until the leg drive is finished. When the legs are finishing their drive then the arms come into play.
The Drive UNDER:
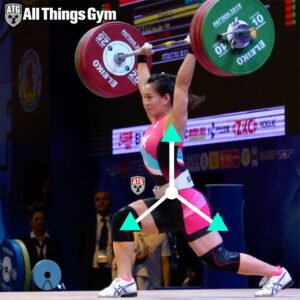
 At this point you drive under the weight, ideally with the same aggression that helped you drive the weight up. This finishing is often what separates a made lift from a missed lift: i.e., plenty of athletes deliver great power but fail to drive under and into the split (or squat, if power/squat jerking). Actively drive and push under the weight and balance the weight on both legs.
As you do so, make sure you’re turning on all the big muscles of the back and torso to support the weight and aggressively pushing up on the barbell. If you’re doing this properly you should be able to hold this position, which is to say the weight isn’t drifting forward or backward (or, even worse, side to side).
The Recovery:

You then recover off the front foot by stepping back and then bringing the rear foot forward and the feet in line. At this point, assuming your elbows didn’t look like cooked spaghetti during your recovery, you should be getting a trio of white lights and a down signal.
That’s it! A short (short-ish) discussion of the basics of the jerk. While this is by no means exhaustive, these are some of the points that I think warrant particular attention. Do a few thousand hours of focused and deliberate practice and you’ll be mastering the jerk just in time for the next pandemic.
If you want to learn more about technical aspects of the jerk, check out our previous article on Rebeka Koha’s jerk technique, which includes insights from her coach.
NB: The jerk, like the snatch, is a lift of incredible technical precision. I am reminded of an old academic joke about what German scholarship is like: a bunch of nations get together and decide to hold a conference where every country has to present a publication on the topic of “the elephant.” The French present a book called “The Sex Life of the Elephant.” The Americans present a book titled “How to Make Bigger and Better Elephants.” And the Germans present “A Short Introduction to Elephants, Volumes 1-6.” Anyone who’s read German scholarship knows how accurate this is. The point of this digression is that the jerk is perhaps one area in which the degree of thoroughness seen in scholarship by Ze Germans is entirely warranted.
This is a very valuable analysis of the jerk, which is in my experience the most technically nuanced of the three competition lift elements – snatch, clean and jerk -and the most difficult to master.
Regarding the dip, my experience is that the downward force of the bar is into the heel/front of heel as the shoulders, hip and heel/front of heel are in line pre-dip.
Thanks Pete! I’d agree that the jerk is the most technically nuanced of the lifts (but generally gets far less technical attention). As for the heel/front of heel, my experience with most coaches has been what you’ve mentioned; in using “midline” here I’m hoping to cover a few bases, since some people are closer to the midfoot than the heel (although in my own lifting and coaching I, like you, emphasize front of the heel).